At this point in the repair process, the customer has been made aware of the extent of the damage and wear on their ring, and the necessary repairs were discussed and agreed upon. We will remove the new shank and two broken
and cracked settings from either shoulder of the ring and install new
platinum low-base heads that will be much more structurally sound,
reattach the ring shank, and reset the side diamonds. Simple enough, right?
Not exactly. For all the planning and research that one can do prior to beginning a jewelry repair, there are always little details and minor logistical realities that can occur and turn a straightforward repair into a complicated, expensive undertaking.
Since the side low-base platinum 4-prong settings on the ring were already broken, it was an easy procedure to cut and grind off the remaining metal on the center head portion and smooth everything out with a fine grit rubber wheel. The more pre-polishing you can do prior to assembling heads and parts, the less difficulty you will have later on after everything is assembled. Often, the assembled parts will be arranged such that they block or restrict access to a particular area or inside corner for polishing, so pre-polishing parts will lead to only needing to touch up the solder seams with a fine wire wheel and then a bristle-brush wheel charged with polishing compound.
The new shank that had been previously installed was in good shape, and only needed to have the old laser-welded ends of the V-shank reground to remove all the old weld area. This is done mainly because one has no way of knowing if the correct welding wire was used previously, and if one welds over it without removing it, you are potentially changing the alloy of the metals you are welding together right at the weakest point of the structure, which can lead to weld failure.
At this point, all the original parts were prepped and pre-polished, and I was ready to order my new platinum low-base heads. This is where I hit my first major road block. The main supplier we use, Stuller, did not carry a platinum low-base head in the size that I needed, approximately 1.7-1.8mm. This was a surprise, as it is a very common style of head and has always been in stock in the past.
Ok, how about ordering a platinum tube bezel with a pre-cut bearing and carving the scallops by hand with a krause bur and a rubber wheel? Nope, Stuller only carries platinum tube bezels down to 3mm. Why wouldn't they?
Gold and silver are far easier to manufacture and work with for a findings supplier, and so one will often run into issues finding the right part in platinum. Many parts are die-struck as opposed to being cast, and some styles of finding and some manufacturers have physical limitations on what metal they can make certain parts in based on their machinery parameters.
At this point, I might have tried finding the parts from other manufacturers and suppliers, but Stuller's selection is pretty comprehensive, and we already have an account with them and place orders daily. Also, a due date was already promised to the customer for the completed repair, and spending more time sourcing the parts from an unknown supplier had the potential to introduce even more variables and delays into the process.
Another issue with using pre-made low-base heads and tube bezels, assuming that I could have even found them in platinum in the right size, is that they are usually die-struck from relatively thin metal. This yields a light and strong setting that is also affordable because the manufacturer has reduced the metal weight to cut costs. However, in this particular case, the original heads that were in the ring had a very deep scallop on the sides, which gave the settings a very sculptural and delicate look. Normal low-base heads are fairly plain and simple, so I would have had to lower the scallop and add a bevel running down the side of the setting with a cylinder bur and rubber wheels to achieve the same effect. The issue with this is that in doing so I would drastically weaken the structure of the already lightweight setting, leaving it no stronger than the broken settings the ring already had.
The next best option to ordering the correct settings or making dangerous modifications to a pre-existing part was to fabricate them myself from heavy wall platinum tubing. This would allow me to exactly match the style of the original settings without compromising the structural integrity of the ring and without delaying the completion of the ring while I search for the right parts.
Guess what? Stuller does not carry heavy-wall platinum tubing in the size I need. Perfect.
After going through the process of hunting down every possible pre-made solution for the repair, my only option left was to order 12-gauge platinum wire and drill and carve the settings by hand. While time-consuming and more challenging than working with a part that already had a hole for the stones or pre-cut seats to fit the diamonds, the resulting settings are far stronger than anything I could have ordered from a supplier.
Once I had the platinum wire, I filed the end flat, drilled a pilot hole in the end with a small drill bit, cut the seat for the diamond with a setting bur, and carved the sides of the setting to match the curved scallops of the of the original rings undergallery design. Once completed, I polished the setting while it was still on the end of the wire, as it is much easier than trying to hold a tiny part against a buffing wheel and risk losing it entirely. I cut the setting off the wire at the appropriate length with a jewelrs saw and made a matching setting in the same manner.
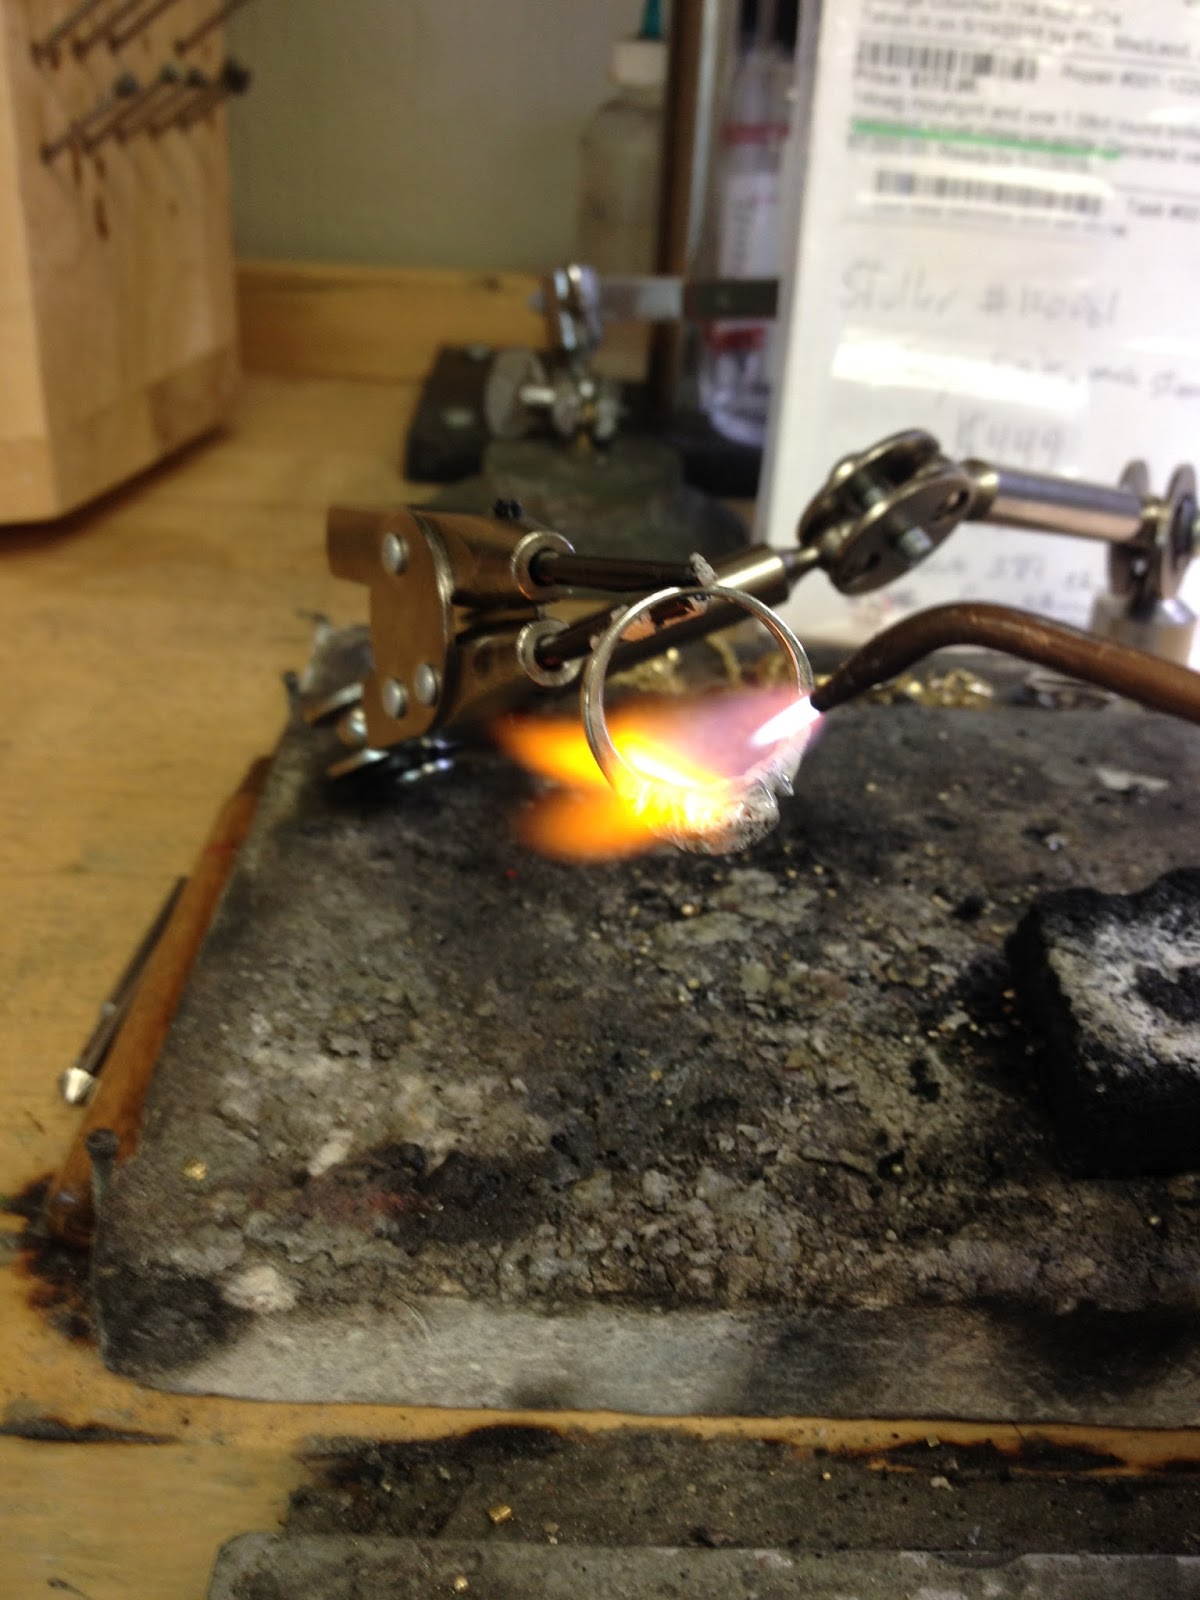
The parts were then tacked in place with a laser-welder and soldered with 20k white gold solder. Platinum solder was not really an option due to the proximity to the diamonds and the risk of unsoldering previous repair or assembly joints in the vintage top plate.
The ring was cleaned, the diamonds were set, everything was given a final polish, and another repair on a vintage piece of estate jewelry was completed.
The original head plate, shank, side diamond, and raw platinum wire.
Test-fitting the diamond into the hand-carved setting in the end of the solid platinum wire
The two completed settings, cut off the wire stock and pre-polished, ready for installation.
Soldering the settings in place between the shank ends and the central plate
with 20k white gold solder.
The completed repair. Note the scalloped design on the side of the central plate
is echoed in either side accent diamond's setting.
Side view of the hand-made platinum settings installed with the
original shank and vintage top plate.